Extend Your Session Beer Volume

If you read my recent article on sparging session beers, you’ll know that fully sparging the grain bed for a low-gravity session beer can yield less volume than a typical pre-boil wort target. For a 5.0-gallon (19-L) batch of session beer, you’ll collect less than 6.0 gallons (23 L) of wort and perhaps even less than 5.0 gallons (19 L). The simplest way to deal with this is to add water to your wort to yield a volume you can boil for 60 to 90 minutes. Another way to deal with it would be to boil the smaller volume for your desired boil time, then add cool water to the post-boil wort in the kettle. This way saves you a little time when chilling the wort. 

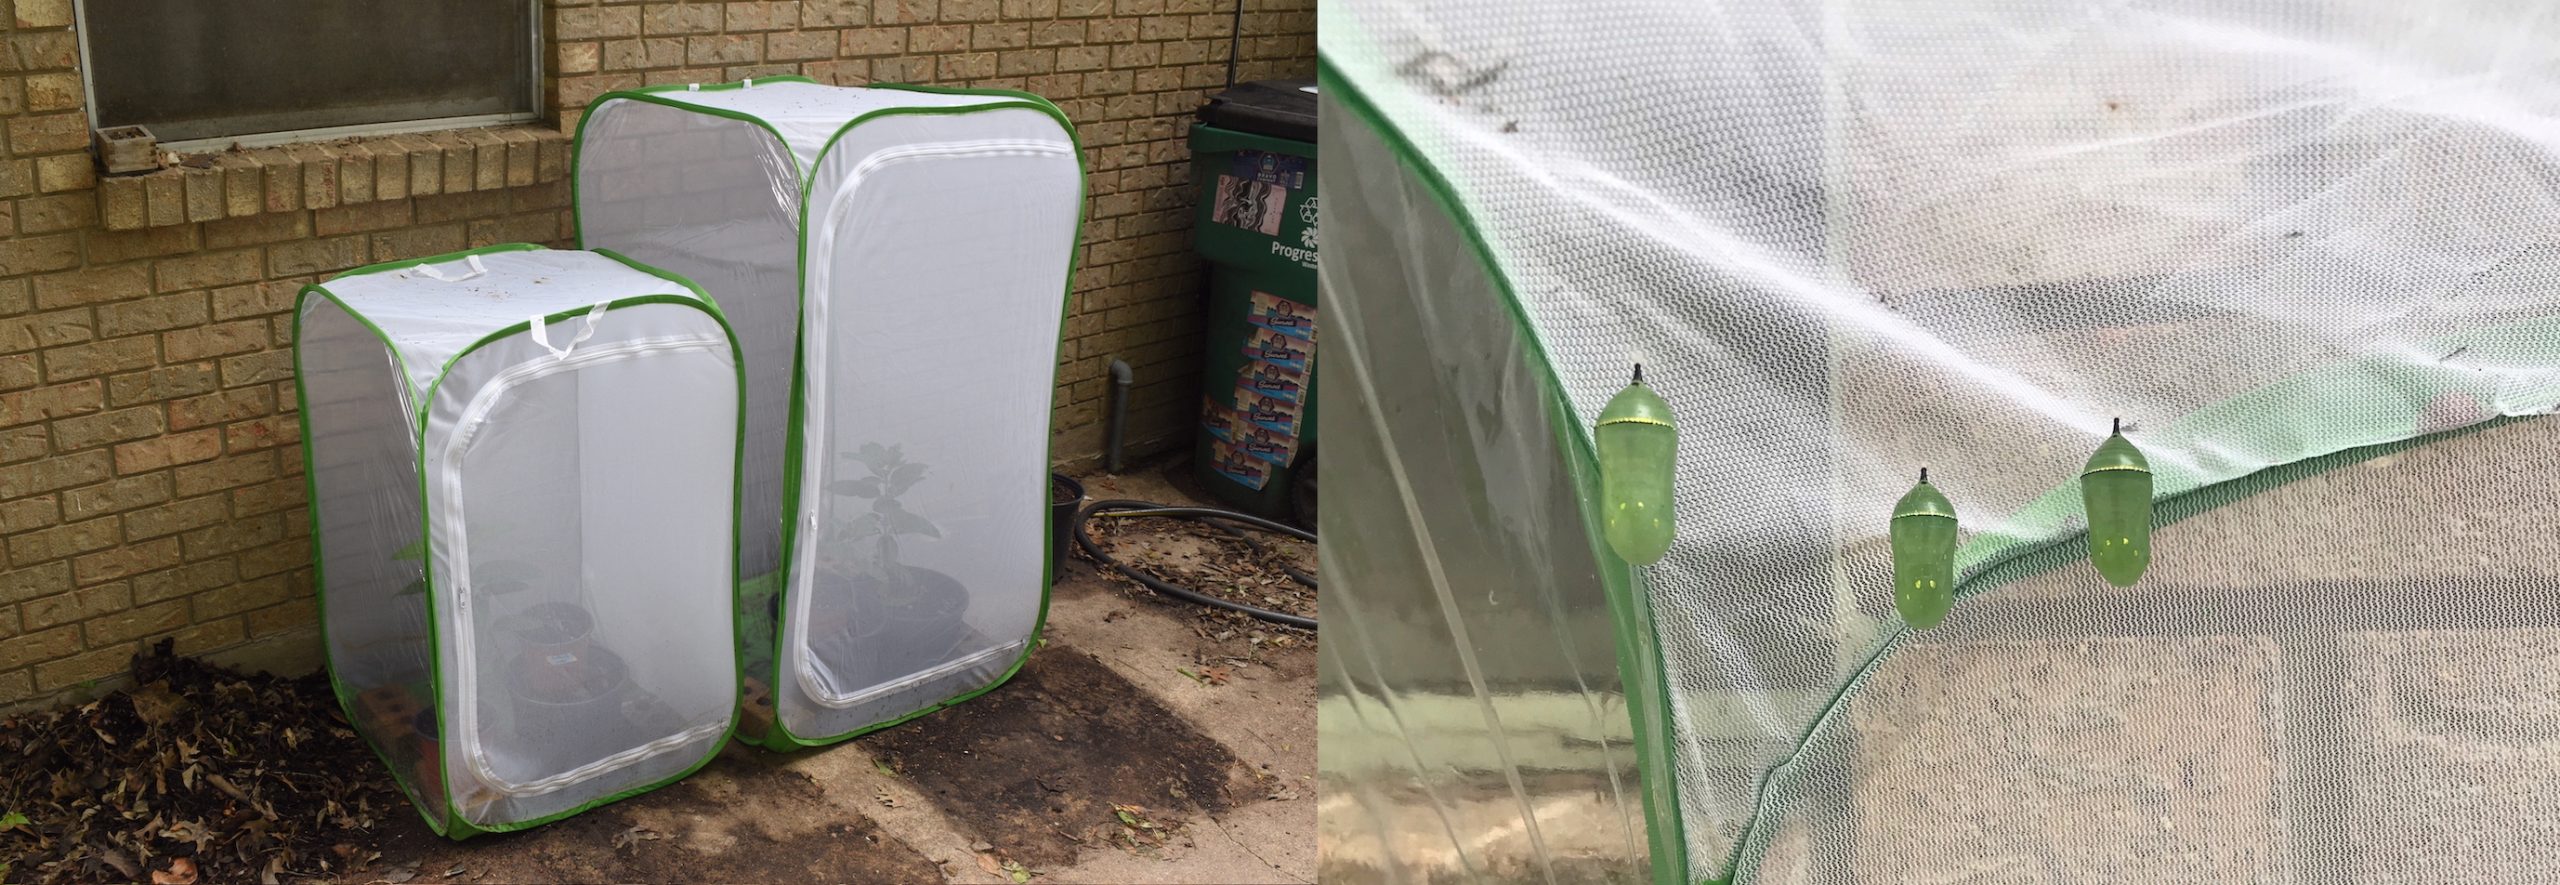
That baby cracks me up

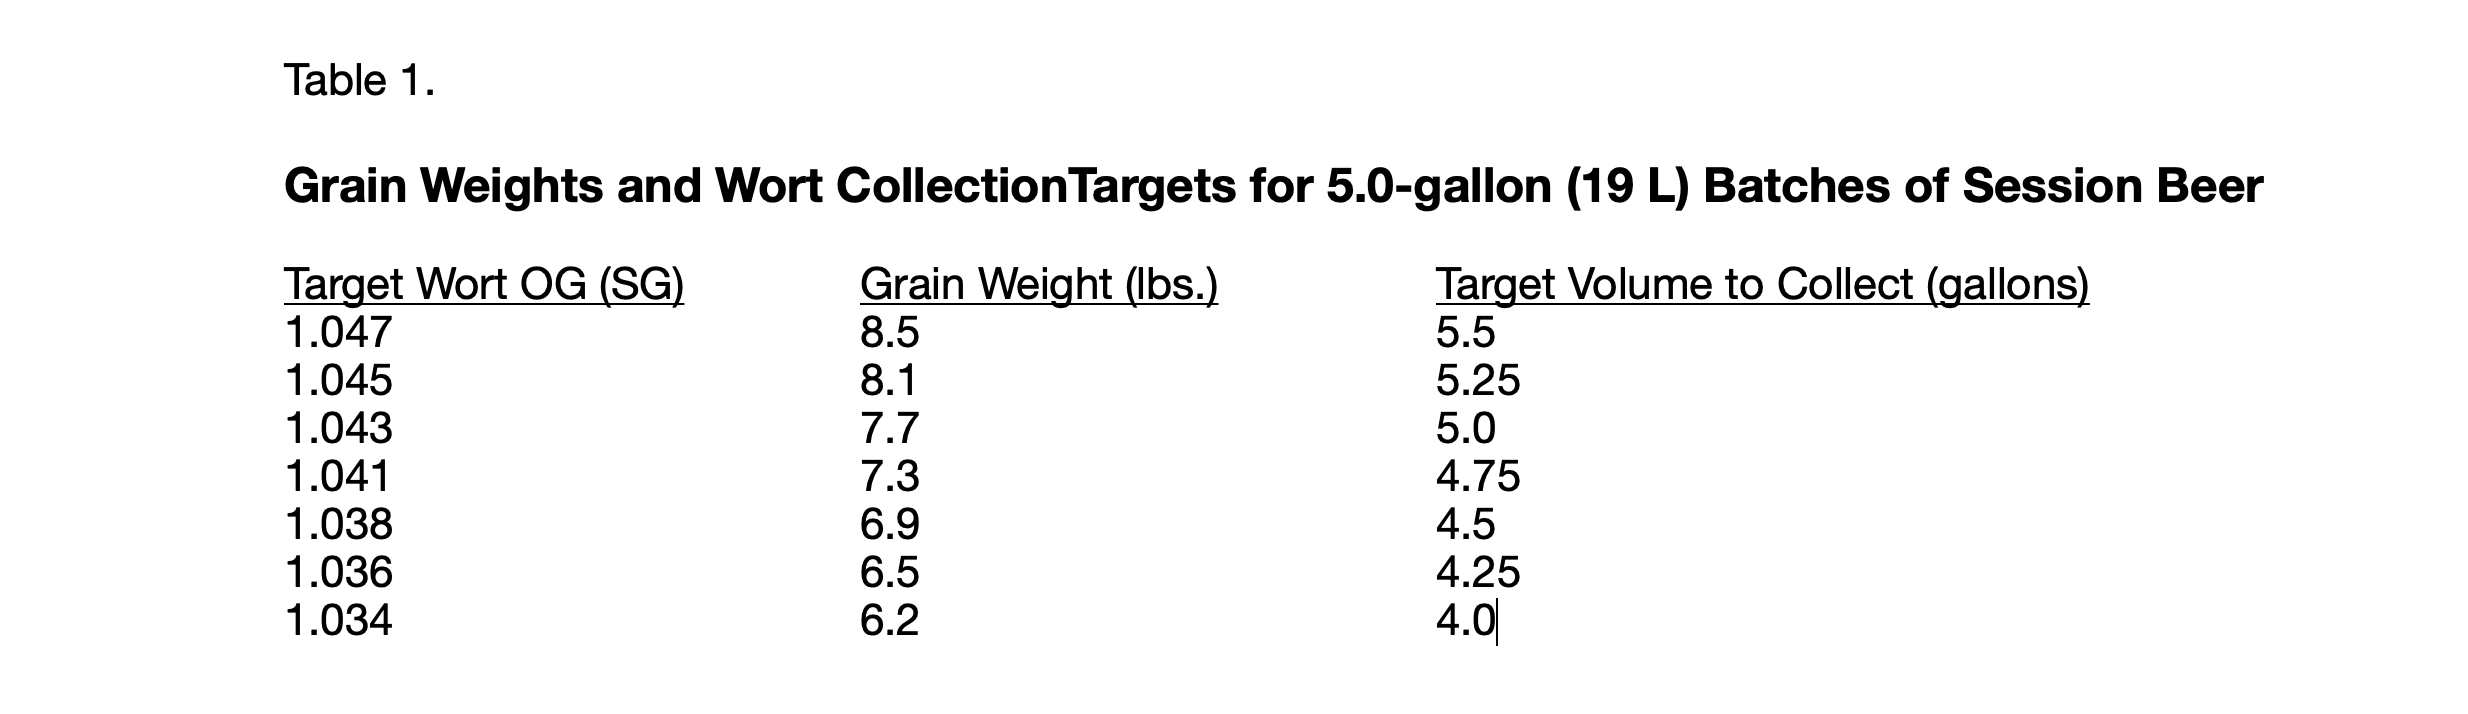
However, there is a third possibility — one that will yield more beer with the same amount of effort and using your same equipment (except perhaps for a second fermenter). The third possibility is to select an amount of grain that will yield either 6.0 gallons (23 L) or 6.5 gallons (25 L) of wort from a fully-sparged grain bed. This is 9.25 lb. (4.2 kg) and 10.0 lb. (4.5 kg), respectively. This will allow you to perform a 60-minute boil or a 90-minute boil, whichever you prefer. In either case, your pre-boil wort should have a specific gravity (SG) around 1.043. After a 60-minute boil of the 6.0 gallons (23 L), your original gravity (OG) should be close to 1.051. For a 90-minute boil of the 6.5 gallons (25 L), 1.056. Then, dilute this wort in your fermenter to your target original gravity. (In practice, your numbers may vary slightly from these. If you try this, take good notes on your grain weight, your wort yield, and the density of your  pre-boil and post-boil wort. With that information, you can tweak your process, if needed, the next time you brew.)

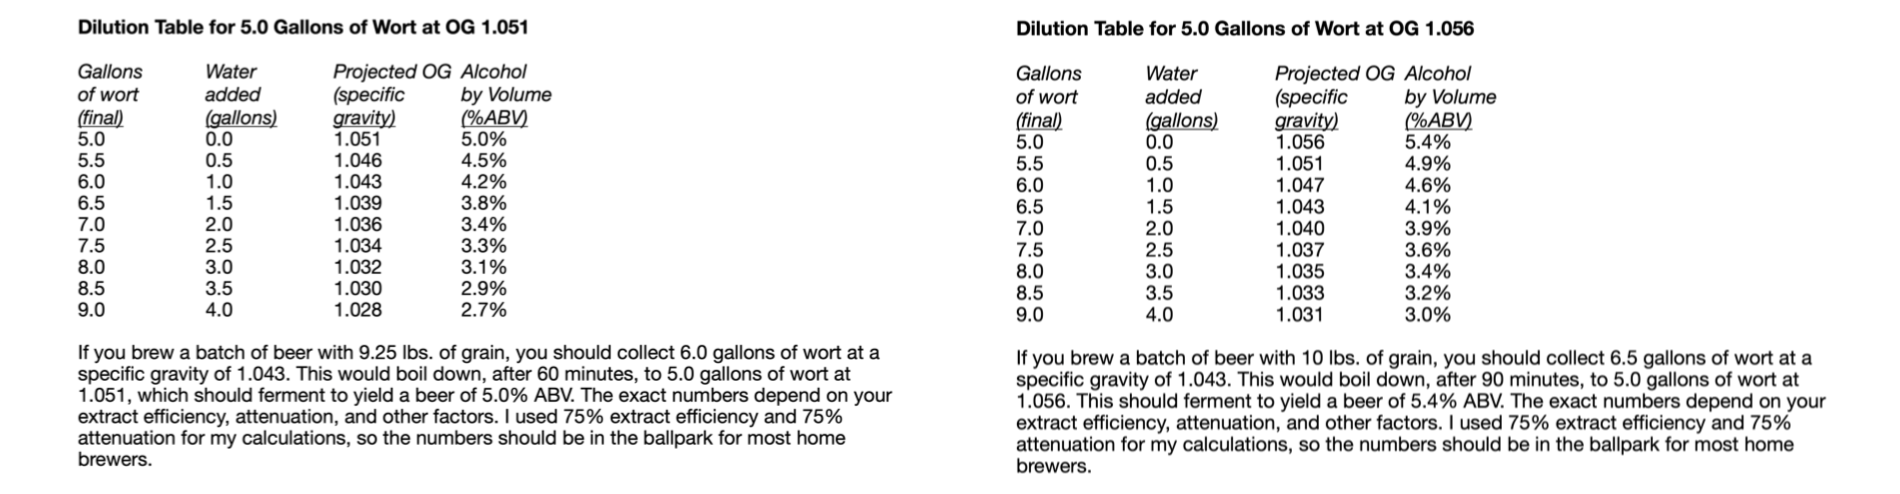
Dilution tables for 5.0 gallons (19 L) of session beer. Click to expand.

The two tables above show you how much dilution water you need to hit a variety of original gravities in the session beer range. As an example, let’s say you wanted to brew an ordinary bitter at an OG of 1.036. Furthermore, you wanted to start with 9.25 lb. (4.2 kg) of grain and boil for 60 minutes. On the appropriate table, find the OG of 1.036. Look to the left of that number to see you’ll have to add 2.0 gallons (7.8 L) of water to the 5.0 gallons of post-boil wort for a yield of 7.0 gallons (26 L) at SG 1.036. Once you know this, formulate a recipe for 7.0 gallons (26 L) of bitter, but brew it as a 5.0-gallon (19-L batch). After the boil, chill the wort and dilute it to your target strength in your fermenter (or fermenters). 

Using this method, you can make more than 5.0 gallons (19 L) of beer with the almost the same amount of effort as brewing a 5.0-gallon (19-L) batch. And you won’t need a larger mash tun or kettle. All you’ll need is more fermenter space. Since session beers are meant to be “the one to have when you’re having more than one,” it can be good to brew a little extra. 


First Adult Monarch Butterflies Emerge

This past week, May 2nd through May 8th, my first adult monarch butterflies emerged from their chrysalises. The eggs had been laid in early April. The larvae developed through 5 caterpillar stages, called instars, through the middle of April. The caterpillars then formed a chrysalis and hung for about 10 days. As you might recall, I was hoping to raise and release 240 monarchs this spring. This week, I released 36.


A monarch butterfly immediately after emerging from its chrysalis, then a minute or so later when it had most inflated its wings. You can see the distended, fluid-filled abdomen in the first pic. The butterfly rhythmically squeezes the liquid from this into the veins on its wings to inflate them.


If I could release 36 more each week for the next 6 weeks, I would hit my goal. Unfortunately, after the first few female monarchs laid eggs in my garden, I quit getting visits. As I detailed in this post, our weather was cold and additionally the number of monarchs this year are down. I did have another female visit this past weekend, so I should have caterpillars from her soon. However, I have yet to see any.


Butterflies hanging in my enclosure. After emerging from their chrysalises — or eclosing, in the lingo — the monarchs must let their wings dry before they can fly. Their wings are too heavy when they are still wet.


In Central Texas, “monarch season” usually lasts from early April through mid-June, so I still have time. And the garden is in great shape — lots of milkweeds and plenty of other native perennials blooming. But, the clock is ticking.

Two of the 36 monarch butterflies I released. Note how vivid the colors are on the upper wing just after eclosing. This coloration fades over time.


Don’t Overpitch a Session Beer

[This is the second article in a series on brewing session beers. In the first, I discusssed sparging the grain bed for a low-gravity beer.]

In the past, a common problem among homebrewers was pitching an inadequte amount of yeast. The original containers of liquid yeast did not contain enough yeast cells to yield an ordered fermentation of 5.0 gallons (19 L) of average strength or higher wort. They “would work,” but start times were longer than they should have been and sometimes the beer did not attenuate fully. However, some brewers did not want to go through the hassle of making a yeast starter. 

These days, homebrewers have access to liquid yeast packs that have 100 billion cells or 200 billion cells. And of course, we’ve always had access to dried yeast packets that have a large cell count. An 11.5-gram packet of dried yeast, for example, contains over 200 billion cells. And all that is great —  except when you are brewing a session beer. For a low-gravity beer, the amount of cells in a commercial yeast packet might actually be too high.

Generally, the problems associated with overpitching are less troublesome than the problems associated with underpitching. However, in a session beer, overpitching can detract from the beer’s character. Overpitched beers may attenuate to a greater degree than you want. With a session beer, you already expect a low finishing gravity because of the low starting gravity. So “extra” attenuation is unwelcome. You can moderate this somewhat by adding more crystal or caramel type malts to your recipe or mashing for a shorter time at a higher temperature. However, higher pitching rates also increase your overall attentuation. 

In addition, the yeast character from ale strains is mostly developed in the early growth phase of the beer fermentation. Fewer esters are produced once the yeast has reached their maximum density and are fermenting compared to when the population is still growing. So, overpitching can minimize the yeast character of a session beer. And given that many session beers are low-gravity, English-style ales, this character will be missed. Even in a non-English-style beer, some yeast character in a low-gravity beer gives it more overall aroma and flavor — something that can be lacking if the beer is not brewed well.  

For a low-gravity ale, I recommend pitching even less than the typical ale calls for. The general rule of thumb for ales is to pitch a million cells per mL per °Plato. So, for example, 5.0 gallons (19 L) of 12 °Plato (SG 1.048) beer — one that should produce a beer around 5.0% ABV — would need 227 million yeast cells. However, 5.0 gallons of a 9 °Plato (SG 1.036) beer — one that should produce a 3.5% beer — only needs 170 million cells. Pitching 200 million cells to a beer like this would not be drastically overpitching, and you’d probably get away with it. However, if you wanted to purposely underpitch to develop more yeast character, 130 million cells would be a better target. That’s 75% or the amount the general rule would suggest (and in line with the pitching rate of many commercially produced ales). 

Fortunately, it is easier to deal with having too much yeast than too little. If you have a 200 billion yeast cell container of yeast, and you want your pitching rate to be less than that, just pitch part of the package. If you wanted 130 million cells, for example, you want to pitch (130 million cells/200 million cells =) 0.65 or 65% of the yeast in a 200 billion cell package. Be sure to shake the package so that the yeast is evenly distributed before dividing it. You could perhaps utilize the unused yeast to make bread, or another yeast starter, if you were concerned about wasting it.

Alternatively, you can use a yeast pitching calculator to determine the size yeast starter that would be required. Then, pitch a small amount of yeast to the starter — NOT the whole pack — and let that grow. Recall that 8.0 fluid ounces (240 mL) of yeast slurry is generally adequate for 5.0 gallons (19 L) of 12 °Plato (SG 1.048) beer. So, if you were making a 1.0 qt. (~1 L) yeast starter, about 1/20 of that volume — 0.4 fluid ounces (12 mL) of yeast slurry would be required. I nearly always make a yeast starter because I can assess the health of the yeast based on the vigor with which they ferment the starter wort.

Brewing a high-quality low-gravity session beer requires every bit as much attention as brewing a big beer. The “tricks” are just different. For starters, don’t use too much sparge water on your grain bed nor pitch too much yeast to your wort. More session beer posts are in the works.

Monarch Project Off To Slow Start

I am hoping to raise and release 240 monarch butterflies this year. However, my project is off to a slow start. My garden received a few visits from female monarchs in late March, but none that I have seen since. The weather has been unusually cool and additionally, monarch numbers are down this year. So, either one of those factors, or both, could be to blame. I have plenty of milkweeds in my garden and more blooming flowers than I have ever had. But I need gravid females to visit the garden.

I have two butterfly enclosures (left) that I place milkweed plants in. The caterpillars I capture are placed on those plants. Three of my 20+ monarch butterfly chrysalises (right) currently developing.

I currently have over 20 chrysalises in my enclosures, but few caterpillars to back them up. I need a fresh wave of eggs and subsequently caterpillars. Of course, every year the arrival of monarchs is episodic. And good weather in May — and a bit of good luck — could turn everything around. The spring monarch migration through Texas is still in its early stages. However, this is a disappointing start.

Choosing Tomato Transplants

You can start tomatoes from seeds, but many gardeners buy seedlings (or transplants) in the spring. Choosing the best transplants will result in tomatoes that rebound quickly from being transplanted, grow vigorously, and yield the best crop. Fortunately, choosing the right transplants is straightforward. Except for one thing, all of the criteria for choosing the best transplants are fairly obvious. 

When looking through tomato transplants at a nursery, your first goal should be to identify the healthiest plants. Yellow leaves, which can often be found among the lowest leaves on the plant, indicate a lack of nitrogen. A purple cast, especially around the edges of leaves, is likely to be a phosphorus deficiency. This is less common than a nitrogen deficiency. Tomato seedlings should be a moderate to dark green — but not blue green, as that is evidence of too much nitrogen. And, obviously, they should not be wilted. Wilting could be due to a lack of water — in which case it is easily solved — but it could also be a sign of more serious problems. Young tomatoes — transplanted into well-drained, fertile soil — can quickly overcome early nutrient or water deficiencies, especially if they are minor. However, it’s best to start with the healthiest plant possible. 

Yellow leaves, most often seen near the bottom of transplants, are a sign of a nutritional deficiency. Deformed leaves may be the result of disease. Transplants can quickly overcome mild nutritional deficits.

When looking at transplants, also look for holes in the leaves, which may be indicative of an insect infestation. The leaf damage in and of itself is not particularly worrisome. However, some insects — such as white flies — carry diseases that can manifest themselves when the plant is larger. Also look for leaves that are curled, blotchy, or malformed, as this may be the fist signs of disease. Avoid these plants. 

The final thing to look for in a tomato transplant may seem counter-intuitive — look for the smaller transplants (among plants in same-sized containers). Tomatoes are often sold in tiny 4-well flats, 4″ planters, or in small cups that hold a little more soil. Much of the time, nursery transplants have overgrown their planter by the time they are on display. They can look healthy, but they are rootbound. Nurseries offer these transplants because people want to buy large plants. They think they are getting ahead that way. If there is a table of tomato transplants at a nursery, you almost always see people crowded around the largest plants.

Sometimes, the plants for sale already have flowers. And people obviously like to buy them, apparently because they think they will have tomatoes soon. However, early flowering is not desirable as it is indicative of the plant having switched from rapid growth to an attempt at reproduction. You may get tomatoes fairly quickly, but they will likely be small and the rest of your crop with not be very abundant. 

When you take overgrown transplants out of their container, the roots will be a tangled mess, pressed against the sides of the container. The above ground foliage can look healthy. However, once planted it will take time for a rootbound to acclimate. They will be slow to start vigorous growth. Rootbound tomatoes will rebound with time, but you are better off starting with smaller transplants. These will quickly start growing vigorously and — if you plant at the right time — be the right size when it it is time to flower and set fruit. 

This plant is roughly twice as tall as its container. Its roots have grown to the sides of the planter, but are not excessively tangled or knotted. It should quickly rebound and resume vigorous growth when planted.

A reasonable rule of thumb is that the transplant should be less than three times as tall as the container it is growing in. Optimally, I think that when a plant is twice the height of its container, it is fairly large, but small enough that it will acclimate quickly when planted. Because it is not rootbound, it was likely growing quickly inside its container. And it will continue this vigorous growth‚ after a very brief period of acclimation — when put in the ground.

That’s really all there is to choosing transplants. Pick a healthy, green plant — one that is small enough that it is still growing rapidly in its container — and you are off to a great start.

Don’t Oversparge When Brewing a Session Beer

Session beers are low-alcohol beers that allow the drinker to consume a few without becoming too intoxicated. In order to be of high quality, the brewer must pay just as much attention to brewing a session beer as he would to brewing any normal or high-gravity beer. In the next week, I am going to post a few articles with tips on how to make the best session beers. Today’s entry concerns how much wort to collect from the mash.

A session of beers at the pub can lead to stimulating conversation and a wonderful time.

A fully-sparged grain bed has been rinsed of all the sugars the brewer can obtain without extracting excess tannins and silicates. On my homebrew system, using my methods, I can yield around 0.65 gallons per pound of grain (5.3 L/kg). If I collect a volume short of that, I have left fermentable carbohydrates behind. If I collect more than that, and I risk astringency. This has some implications when brewing a low-gravity session beer. 

Below a certain original gravity (OG), a fully-sparged grain bed will yield a volume of wort less than can be boiled for 60 minutes and still yield 5.0 gallon (19 L). In fact, below a certain OG, a fully-sparged grain bed will yield a volume of wort smaller than your batch size. When this happens, the brewer will need to add water to make up his or her full-pre-boil wort volume. 

Below is a chart that shows beers with target OGs in the session beer range, how much pale malt would be required to hit that target (assuming 75% extract efficiency), and the volume of wort the brewer should collect. Use the chart as a guideline, but also measure the pH and specific gravity of your final runnings if you fly sparge. You can also simply taste the runnins to see if astringency is beginning to show. Once your grain bed is fully sparged, simply add water to hit your desired pre-boil volume. It’s that simple. 

First Monarch Caterpillars In My Garden

I’ve got caterpillars in my garden. The eggs from the first wave of female monarch butterflies started hatching a couple days ago. They took longer to hatch than usual, probably because the weather was a cooler than average in the days after they were laid. Finding monarch eggs on milkweed is fairly hard because they are small and usually on the underside of a leaf. Finding monarch larvae (caterpillars) is much easier — just look for a hole in the leaf. When a caterpillar hatches, the first two things it does are eat the egg casing then chew a small hole in the leaf. It will then expand the hole a bit before crawling off to start feeding in another location. It may do so to prevent other insects from finding it easily and eating it.

A hole on top of a milkweed leaf (left) and the same hole and caterpillar under the leaf (middle). A second example of a monarch caterpillar next to a hole in a leaf.

Monarch larvae develop through five stages, called instars, before forming a chrysalis. The caterpillars in the photo above are first instar caterpillars. The caterpillars below have molted once and are second instar larvae. Each successive instar is larger than the previous one and its coloration pattern is different. First through fourth instar caterpillars are most often found under leaves. They eat nearly constantly, except then they stop to molt.

These second instar larvae are feeding on butterfly milkweed seedlings.

So far, I have set up two butterfly enclosures on my driveway, near my milkweed plants. When I capture a caterpillar, place it on a butterfly milkweed seedling and place the seedling in the enclosure. I have collected over 30 now. Once they have eating most of these seedlings, I will transfer them to larger host plants. (I will put the seedlings back in the sun and they should recover fairly quickly.) My quest to raise and release 240 monarchs is off to a fast start, but there is still a long way to go. I should have chrysalises in a little over a week.

The Monarchs Have Arrived

On Saturday (March 25th), I saw my first monarch butterfly of the 2023 season. It was a washed-out looking female, indicating she had flown all the way from her overwintering spot in Mexico, not recently eclosed from a chrysalis. She flew around my garden for 40 minutes and laid at eggs on many plants. I found seven and there are likely more. In the next three days, I saw a monarch a day, including two more females laying eggs. As such, I could have caterpillars as soon as tomorrow (Wednesday, March 29). It usually takes 3–5 days for monarch eggs to hatch, with warmer temperatures leading to eggs hatching more quickly. I didn’t get a good picture of any of the adult butterflies, but I found and photographed several of their eggs.

Monarch eggs on milkweed

Both pictures are of a monarch egg under the leaf of a common milkweed plant. The egg is the small white “bump” near the center of the pic.

Females almost always lay their eggs underneath one of the uppermost leaves on the plant. They hang on to the edge of the leaf and curl their abdomen underneath to deposit the egg. The uppermost leaves are the most tender and this may be the reason females prefer those. Or, maybe they are easier to navigate to. Reputedly, a female can lay up to 300 hundred eggs in her lifetime. I’ve seen some females lay around 20 eggs in my garden in a single visit.

Monarch eggs on milkweed

Two monarch eggs laid on the same milkweed sprout (left). An unusual case of an egg being laid on top of a milkweed leaf.

So, my quest to raise 240 monarch this year in a garden in central Texas (USDA Zone 8B) is off to a great start. Follow this website to see how it goes.

Milkweed Rhizomes Are Sprouting

A week and a half ago, I planted 30 milkweed rhizomes. And I also have 33 milkweed rhizomes that overwintered in large planters. I now have sprouts from both types of rhizomes.

Normally, I don’t see any milkweeds emerge until mid-March. I’m guessing that the unusually warm spring we are experiencing has spurred them to arise earlier than usual. As in previous years, the first sprouts have come from smaller rhizomes and in smaller planters, which I assume have smaller rhizomes than the large planters. The milkweeds from larger rhizomes lag behind the smaller ones, initially. But they catch up and grow larger than them by early in the growing season.

Two milkweeds that sprouted from rhizomes on February 22nd.

I’m always amazed at how quickly milkweeds grow when they sprout from rhizomes. The rhizome is a thickened section of root that stores starch. That starch can be used for rapid growth in the early spring. In the wild this allows the milkweeds to — at least temporarily — be taller than the surrounding plants and thus have access to sunlight. Milkweeds grown some seeds grow more slowly, and need to sprout in a location where they aren’t immediately shaded by other plants. This difference in early growth makes sense because the milkweed seed has far less starch in it than the rhizome.

The same milkweeds as above, one week later.

I’m in USDA Zone 8B, so I would expect that gardeners in Zone 7 should see their milkweeds sprouting soon. Farther north than that, it is hard to predict as the northern part of the country is still in the midst of winter. Journey North — a website devoted to tracking monarchs and other organisms — shows that I am not alone in seeing milkweeds already.

If you have been following this site, you know that I’m growing these milkweeds in order to raise monarch butterflies. I will also need other flowering plants to attract the monarchs. Already, a few native perennials are flowering in or around my garden. These include spiderworts, baby blue eyes, and oxalis. And I already have flower bud on my gaillardia plants. I hope to raise 240 monarch butterflies this year,. And so far — with the emergence of some of the milkweeds — I’m off to a good start.

Spiderwort (left) and oxalis (right). Both are dependable early bloomers.


Planting Milkweed Rhizomes

I planted 30 milkweed rhizomes on Thursday (February 16th), a major step in my 2023 monarch butterfly raising project. Rhizomes are thickened underground stems that store starch for plants. Rhizomes can send down roots and send up stems. In the late fall, all of the above ground foliage on milkweed plants dies. The milkweed rhizomes then overwinter underground. In the spring, they provide the energy for the plant to sprout. Some types of milkweed also spread via their rhizomes. The underground stems grow horizontally and, over the years, the plant will form a clump with many above ground stems. 

In fall of 2022, I had 66 milkweed plants growing in planters of various volumes, from around 25 gallons down to small, 6” planters that only hold about a quart. I decided to leave the rhizomes in “large” planters — which I defined as 3 gallons or larger — in their potting soil. This is what I’ve done most years. 

Left: Milkweed rhizomes wrapped in damp paper towels and stored in a ziplock bag. Right: Milkweed rhizomes unwrapped and ready to be planted.

However, over the winter, I tipped out all of the small planters and fished out the rhizomes. There were 30 such containers. I wrapped the rhizomes in moist paper towels and put them in ziplock bags. The bags were kept in the refrigerator. I have done this successfully a few times in previous years, so I knew it would work. 

The reason I did this was to move the milkweeds to larger planters. Moving them as rhizomes, I believe, is better than waiting for them to sprout and moving them as growing plants. 

Left: Five-gallon planters holding the rhizomes. You can also see some of the 2-gallon planters on the right edge of this photo. Right: Three-gallon planters holding milkweed rhizomes.

The rhizomes themselves ranged in size. I planted the 6 largest in 5-gallon planters. I planted the next 5 largest in 3-gallon planers. The rest went into 2-gallon planters, so some may not have gotten a larger container. Most did, however, as some of my planters were quite small. 

Planting the rhizomes was easy, I just sunk a trowel into the potting soil and pushed some soil aside. I placed the rhizome vertically into the hole created by the trowel and then removed the trowel. If the top of the rhizome was sticking out of the soil, as it usually did, I added a little more potting mix to the top of the planter. 

The temperature inside the refrigerator was around 40 °F. The low temperatures Thursday and Friday night were in the low 30s °F. So the rhizomes got a final couple night’s worth of cold temperatures. Now, they will start to warm as the forecast calls for a lot of days in the 70s–80 °F and nights in the 50–60s °F coming up. If the last 10 years are any indication, the milkweeds should start sprouting in mid-March — right around the time of the average last frost. 

Soon, I will have milkweed plants.